
Introduction
Maximize security by using the
WWPass PassKeyto perform two-factor authentication into your publicly exposed SSH/SCP servers using WinSCP and Pageant. Never compromise when it comes to security and ditch those legacy username and password combinations. To start, we’ll need a few things:
- Latest version of WinSCP (Installable version preferred)
- Latest version of WWPass Security Pack
- Latest version of Pageant WinCrypt
- WWPass PassKey or KeySet
[
WARNING]
This article does NOT describe how to get an SSH/SCP server configured with Public Key Authenticationor how to load a PKCS#12 certificate/key into the WWPass PassKey container. You can find the full tutorial for that process here:
Securing OpenSSH with WWPass PassKey.
Installing WinSCP
After clicking on the installer icon, you’ll be prompted with a few of the standard installer screens such as language selection and EULA agreement pages. During the process you’ll come across a
Setup Typescreen. At this screen, please select the
Custom Installationoption and click next. At the
Select Componentsscreen make sure that the
“Pageant (SSH authentication agent)”check box is
unchecked. This is necessary because we are effectively replacing the normal Pageant with a modified fork of it that supports the Windows Certificate Store.
Uncheck the Pageant (SSH authentication agent) option
Scripting Pageant WinCrypt
In order to get Pageant and WinSCP talking properly we need to create a batch script that will call Pageant, let it know that the certificate required is in the Microsoft Certificate Store (and not in a .PPK file) and to then launch WinSCP. This automation comes in handy as the typical process would be to do all of those steps individually and, to make things worse, Pageant does not “remember” certificates that were loaded after it closes. The main format of the script will be (in one beautiful line):
start <App Name> /b <Pageant WinCrypt executable> <certificate ID> -c <WinSCP executable>The “start” command is given because we want the console window to disappear after executing this script. Otherwise it will hang around until Pageant itself closes which can be annoying. The “/b” option is to start a process in the background. Pageant “-c” option launches another program (WinSCP in this case) after loading any keys specified. [
WARNING]
If you do not have your Certificate ID, please refer to the
Securing OpenSSH with WWPass PassKeyarticle and come back after you have the ID string. If you can live with it, you can proceed without the Certificate ID and instead use the string “
cert://*” as the ID. This will present to you the list of all certificates in the Microsoft Certificate Store and will allow you to select the certificate you want up-front. This does get annoying if you need to load WinSCP and use your certificate regularly. I highly advice find out the specific certificate you need and getting the Certificate ID string and automate the process properly. Open Notepad and enter your one line script, then save the result as a .BAT file on your desktop. Here’s an example of what the script should look like:
start “WinSCP WinCrypt” /b “C:UsersJoscorpageant_wincrypt.exe” “cert://cn=joscor.com,thumbprint=6a4330ca05c40fdee48342103298c83a02d4ad7d” -c “C:Program Files (x86)WinSCPWinSCP.exe”
Once you save this as a .BAT file (click File->Save As, then make sure the File Type is set to All, then set the file name to
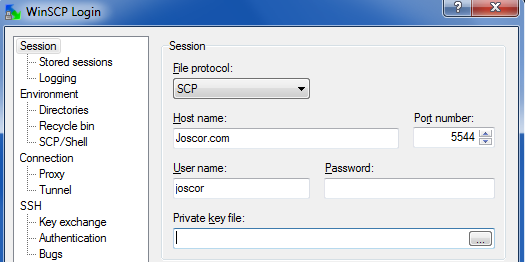
something.bat) on your desktop you should be able to simple double-click on the new .BAT script and it will load Pageant WinCrypt (as well as your certificate) and launch WinSCP. You can verify that Pageant WinCrypt knows about your certificate by clicking on the Pageant task bar icon and viewing the keys. From here you can use WinSCP as you normally would for an SCP session (specify the server IP/FQDN, port and username) but leave the password field blank. Once you hit connect, WinSCP will communicate with Pageant (which is aware of your certificate on the PassKey) and use Pageant instead of trying to send a username and password combination.
Viewing loaded keys in Pageant WinCrypt WinSCP Settings
which basically allows the application to use (not extract) your private key on the WWPass PassKey.
WinSCP Authentication using WWPass PassKey
Congratulations
You’ve now taken your security level from Zero to Hero. What I personally do next is to make sure the server-side OpenSSH service is configured to NOT allow Password Authentication and only allow Public Key Authentication. This will ensure that you’re operating at a maximum security level by forcing the use of high-grade PKI keys.
Leave a Reply
You must be logged in to post a comment.