It’s pretty common for an insurance company or something of the like to provide you an electronic copy of your statements or account details. They usually do this by sending a Secured PDF which is a PDf that has been protected by a password. While this is great for protecting the file, it becomes very inconvenient when that PDF needs to be shared with another company (a bank for instance) and you either can’t tell them the password or, more likely, they will detect it as a virus upon uploading/sending.
So the obvious answer is to remove the password protection. This can be done quickly using the Microsoft XPS Document Writer and Cute PDF. Both of these files take one type of file and “print” out another (essentially converting one format to another). The slick part of these programs are that they emulate a physical printer to the application so the application merely thinks it’s printing a document when, in fact, it is sending the document for exportation to another format.
Step 1) Download Cute PDF by visiting their website at http://www.cutepdf.com and downloading the CutePDF Writer (free download).
Step 2) Install CutePDF Writer using the executable you just downloaded. CutePDF is notorious for bundling their software with additional crap… I mean useful software. Kindly deselect those pesky check-boxes if you’re not interested in the latest Super-Mega-Awesome 2013 XL Toolbar.
Step 3) Open the Secured PDF using Adobe Reader XI (or whatever the latest is by the time you’re reading this, probably something like XXVI by then). Enter the password when prompted so the PDF fully opens.
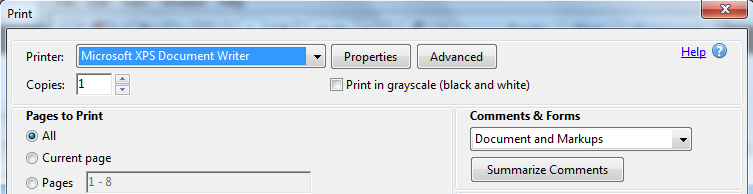
Step 4) Click File->Print and select the Microsoft XPS Document Writer. Click Print and it should prompt you for a location to save the new file (make note of where you save it as you’re about to find and open it).
 Step 5) Now that you have an “image” of the unsecured PDF, we need to convert it back to PDF format for normal use. This is accomplished using CutePDF Writer. Open the saved XPS document you just made using the default Microsoft XPS Viewer. Then click File->Print just like before with Adobe Reader except this time you’ll need to select CutePDF Writer as your printer. Just like before, it will prompt you for a location to save the newly unsecured PDF to.
That’s it! Expecting more? Enjoy your new unsecured PDF!
Step 5) Now that you have an “image” of the unsecured PDF, we need to convert it back to PDF format for normal use. This is accomplished using CutePDF Writer. Open the saved XPS document you just made using the default Microsoft XPS Viewer. Then click File->Print just like before with Adobe Reader except this time you’ll need to select CutePDF Writer as your printer. Just like before, it will prompt you for a location to save the newly unsecured PDF to.
That’s it! Expecting more? Enjoy your new unsecured PDF!
Leave a Reply
You must be logged in to post a comment.