Introduction
It’s no longer good enough to just use a witty password for your publicly exposed OpenSSH server! As brute-force systems become more advanced and password cracking times decrease, your server becomes more at risk. A well-known secure solution to this issue is to use Public Key Authentication. The use of keys dramatically increases difficulty and time for crackers to brute-force access into your server.
If you’re not familiar with how Public Key Authentication works, check out http://en.wikipedia.org/wiki/Public-key_cryptography.
An ordinary authentication into an OpenSSH server using keys goes something like this:
- User generates a public/private key pair on a Linux server (where the OpenSSH service is installed) using OpenSSL.
- User installs the public key on the server so that OpenSSH recognizes it as an acceptable key for use.
- User moves the private key to the system they will be logging in from (the client PC).
- User then specifies to use the private key during authentication to the OpenSSH server and, if it mathematically matches the public key on the server, the user is granted access.
While this is definitely an improvement over using archaic username and password combinations there is still one major flaw. Where does this private key (the “password” essentially, the one item you want to guard as it provides access to servers that have the corresponding public key) live? Does it hang out on your home PC desktop where it’s protected by next to nothing (weak passwords are usually used on home PCs, physical access generally negates all security, multiple users, etc…) or is it placed in something like a TrueCrypt volume where it’s still protected by a password (assuming you’re not already utilizing keys there too)?
While the authentication process between the client and server has increased in security, the security of the private key itself becomes a major concern. This is where the WWPass PassKey Java Card plays a major role. It protects the private key at the hardware level by not allowing key extraction (nobody can copy/take the key off the USB token) and can also provide multi-factor authentication by adding a “pass code/PIN” for any attempts to use the private key. Combine that with the fact that the PassKey stores no personal or identifiable information on the hardware itself it provides an extreme level of security, ease of use, and for the paranoid, plausible deniability.
Get to the tutorial part already!
Ok, so now you get why it’s necessary to use something like a Java Card to protect your OpenSSH server, but how is it actually done? It’s quite simple really. This tutorial assumes you’re connecting to a OpenSSH server running some flavor of Linux (Ubuntu Server is assumed here) from a Windows PC.
Prerequisite tools:
- Putty WinCrypt
- WWPass PassKey
- WWPass Security Pack for Windows
- OpenSSL installed on the Linux server (usually is by default)
- OpenSSH installed on the Linux server (# apt-get install openssh-server)
Step 1) Start by getting/generating your public and private keys/certificates. This can be done on the Linux server (using OpenSSL), through an online site like MobileFish.com, or bought from a proper CA like GoDaddy (recommended). You may also need to convert your private key and certificate into a bonded PKCS#12 (.p12) or PFX (.pfx) file (where the certificate and private key are combined). Ensure that the key size specified does not exceed 2048-bits (maximum currently supported by Java Cards).
For the lazy, here are the steps to create a self-signed PKCS#12 (certificate + private key bundle) on a Linux system using OpenSSL.
1) openssl genrsa -des3 -out server.key 2048
2) openssl req -new -key server.key -out server.csr
3) openssl rsa -in server.key -out server_nopass.key
4) openssl x509 -req -days 365 -in server.csr -signkey server_nopass.key -out server.crt
5) openssl pkcs12 -export -in server.crt -inkey server_nopass.key -out privatecert.p12
6) chmod 0600 server.key
7) ssh-keygen -f server.key -y > publickey.key
Starting from the top, line #1 creates the initial private key with a bit size of 2048 (2k). NIST rates this key size as very strong and gives it a complete security assurance until roughly the year 2030 (which honestly, Java Cards will support larger keys before that time anyway shifting the date much further).
Line #2 creates a Certificate Signing Request (normally this would then go to a Certificate Authority (CA) that would basically put its seal of approval on it and back your certificate by signing it.
Line #3 simply removes the password protecting the private key created in line #1.
Line #4 self-signs the certificate signing request (csr) that we made earlier. It gives it a 365 day lifespan.
Line #5 is where we combine the self-signed certificate and our private key into a PKCS#12 bundle.
Line #6 just sets more restrictive permissions on our private key so that OpenSSH doesn’t flip out when we extract the public key next.
Line #7 extracts the OpenSSH-formatted public key (ready for use with OpenSSH, no conversion necessary).
Now you will need to copy your PKCS#12 (.p12) file from your Linux server to your Windows system. This PKCS#12 file is what gets pushed onto the Java Card.
Step 2) Install the public key into your OpenSSL “authorized keys” file. You may need to do a little conversion to make your public key compatible with OpenSSH but that’s widely documented online. You can copy your public key to the authorized keys list by simply using the “cat” Linux command. These commands need to be done on the Linux server running OpenSSH and with the working directory being the normal user account’s home directory (typically ~/).
cat publickey.key >> ~/.ssh/authenticated_keys
Because I’m a nice guy, here’s also the command to convert a non-OpenSSH public key to the proper format:
ssh-keygen –f publickey.pem –i –m PKCS8 > publickey.key
Step 3) Now it’s time to actually load the PKCS#12/PFX file onto the PassKey token from the client PC (Windows system). This is done by a handle Microsoft tool called CertUtil. The command to install the private key/certificate onto the token is (note, must be run in a command prompt with administrator privileges):
certutil –csp “Microsoft Base Smart Card Crypto Provider” –importPFX privatecert.p12
This simple takes your private key in PKCS#12 format and pushes it to the token via the Microsoft Base Smart Card Crypto Provider CSP. It will prompt your for your PFX password on the certificate if you set one.
You can also do this import by using Firefox or Thunderbird but that is not covered here!
Step 4) Before the connecting Windows system can be used properly we need to use a modified version of Putty called putty_wincrypt (version used was putty_wincrypt_20120424.exe). This distribution of Putty incorporates the utilization of Microsoft CSP (including the Base Smart Card Crypto Provider which can access the WWPass PassKey token) for authentication. To set up using CSP during connection to the OpenSSH server you must go to the Putty settings and select SSH->Auth. There is a section to define a private key file for authentication, this must now be set to cert://* which forces Putty to use the Microsoft CSP, and by extension, the PassKey to search for certificates.
Step 5) Now both the connecting system and server are configured for smart card authentication. The next step is to actually initiate the connection. In Putty this is done by going to the Session screen and entering a valid SSH server and port into the “Host Name (or IP address)” field. Note: Standard SSH port is 22.
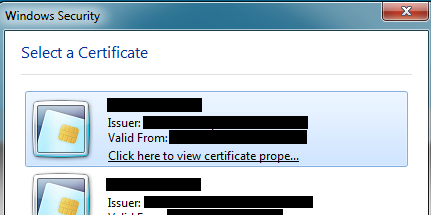
After clicking “Open”, then connection will initialize. Even if no token is provided, this method will still search for local CSP certificate stores (which is a whole other topic). Before clicking “Open” ensure that your token is inserted and operational. After starting the connection the token’s LED light should begin flashing indicating activity and after a brief period of time a Windows Security “Select a Certificate” prompt should appear giving the user the choice of which detected certificate to use for this particular connection (quite handy when you have multiple certificates being used for authenticating with different servers).
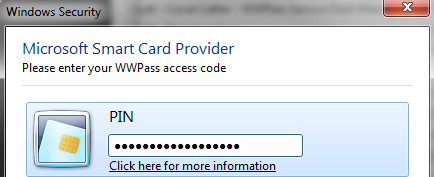
After a certificate has been selected, the token will prompt for the user’s Access Code (PIN) so that it can access the embedded private key of the PKCS#12 certificate. Remember, the beauty of using a Java Card / WWPass PassKey for this type of authentication is that the private key is NEVER exposed (never cached, copied, placed into memory, etc…) and all cryptographic functions are done on the hardware token itself.
Once a valid PIN is entered Putty will mathematically compare the private key extracted from the token’s certificate to the server’s public key. If they’re a match then the user will be authenticated into the system and provided a shell.
Step 6) We’re almost done, we just have one bit to wrap up so that this entire process doesn’t have to be repeated every time. We’re going to specify which certificate we want to Putty (instead of being prompted to select one every time, which gets old fast).
Now that you’ve successfully authenticated into the server you should see a very important string starting with “Authenticating with public key cert://…”. This string will tell Putty which certificate to use in the future instead of prompting you every time. In order to update Putty we just have to go back to where we originally told it to use cert://* in the SSH->Auth settings and replace it with that full string starting with “cert://cn=” (do not copy the quotation marks).
Congratulations!
That’s it! Save your configuration/session and you’re now protected by public key authentication and the WWPass PassKey. This gives you true multi-factor authentication (something you know and something you have)!
If you want now disable password authentication (forced use of keys) for OpenSSH then you need to edit the /etc/ssh/sshd_config file. Modify/add these lines and you should be all set (this also includes a couple extra goodies to help protect your system):
# /etc/ssh/sshd_config
# Set SSH port to something non-standard (you’d be surprised how effective this is)
Port 9001
# Disable “root” account from logging in via SSH
PermitRootLogin no
# Allow Public Key Authentication mechs
RSAAuthentication yes
PubkeyAuthentication yes
AuthorizedKeysFile %h/.ssh/authorized_keys
# Disable legacy Password Authentication
PasswordAuthentication no
UsePAM no
To take your security to an even higher level, check out my tutorial on Hardening OpenSSH.
If you find yourself getting an error message Putty Fatal Error stating “Server refused our key” and “Disconnected: No supported authentication methods available (server sent: publickey)” after entering your username, please refer to the article Putty SSH “Server refused our key” Fix.


