What is DANE TLSA?
According to Wikipedia –
DNS-based Authentication of Named Entities (DANE) is a protocol to allow X.509 certificates, commonly used for Transport Layer Security (TLS), to be bound to DNS names using Domain Name System Security Extensions (DNSSEC).[1]
It is proposed in RFC 6698 as a way to authenticate TLS client and server entities without a certificate authority (CA).
How to configure DANE TLSA
If you have a DNS host that supports DNS-based Authentication of Named Entities (DANE) TLSA records, you might as well upgrade your DNSSEC (you are using DNSSEC, right?). Generating a TLSA hash and adding the DNS TLSA RR is pretty easy so let’s get started. Note – If you DON’T have a DNS host that supports TLSA (currently as of this writing – GoDaddy and Dyn DNS Standard do not support TLSA) – I’d suggest either Dyn DNS Managed Express or DNS4.PRO (which is free, btw).
1. Browse to your HTTPS-secured website and click the security icon to see security information. Click the security icon and then click the Certificate Information link.
Find the secure icon (green lock to the left of the URL in Chrome)
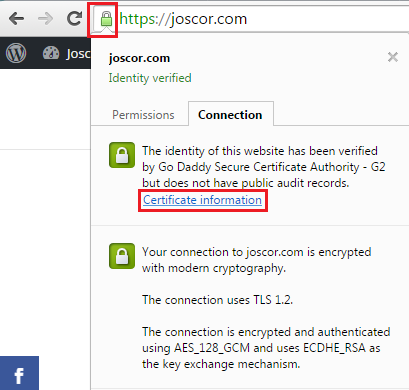
View Certificate Information
2. You now need to begin the process of exporting your certificate to file. Click the Copy To File… button.
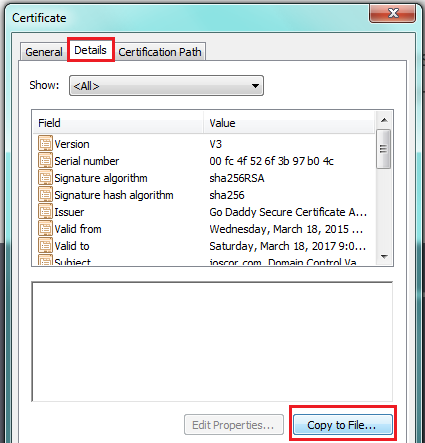
Export your SSL certificate
3. Make sure you export the certificate with Base-64 encoding (as that’s what the TLSA RR generator expects later).
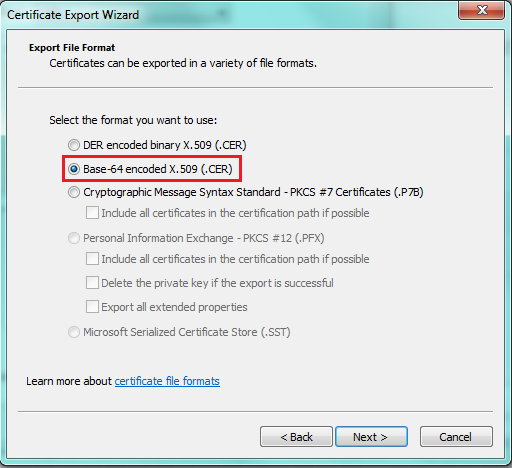
Select Base-64 encoding when exporting your SSL certificate to file
4. Right-click on the file you just exported and open it with Notepad (or any text editor). Copy the contents (it should start with —–BEGIN CERTIFICATE—–).
5. Open a web browser and head over to https://www.huque.com/bin/gen_tlsa (opens in a new window). This site has a handy TLSA RR generator that we’ll be using. Enter the contents you just copied from step #4 and paste it in the section Enter/paste PEM format X.509 certificate here

Enter the certificate text in the DANE TLSA Generator
6. The defaults for the generator are sane so we can leave them be (SHA-256 hash, SPKI, DANE-EE). Enter your domain details at the bottom. For HTTPS TLSA just enter 443 for the port (assuming your site’s HTTPS is over 443), TCP as the Transport Protocol, and enter your domain name. Click Generate
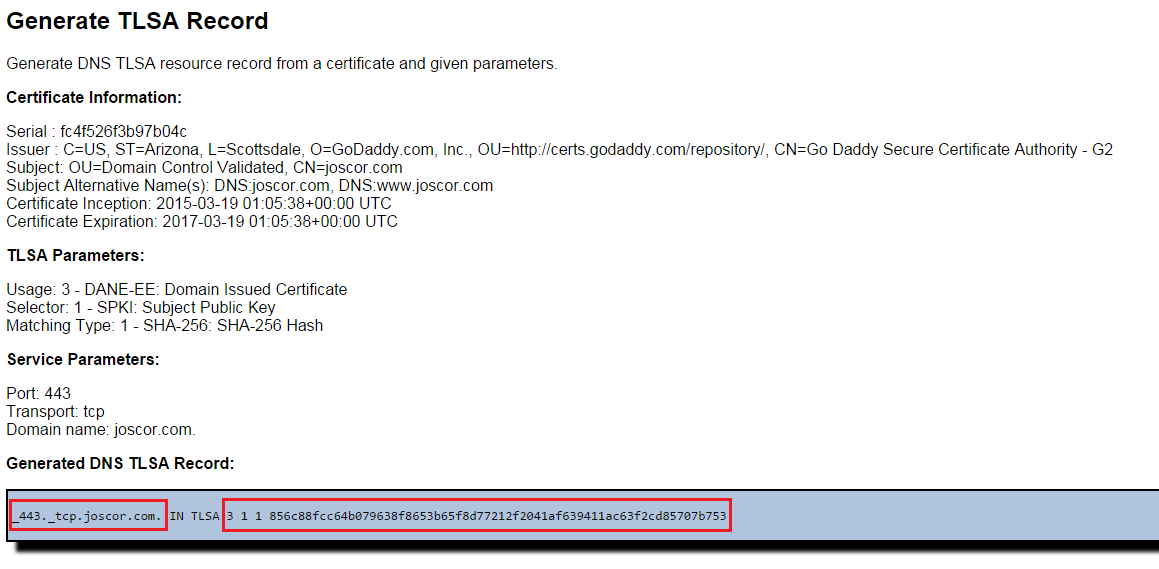
DANE TLSA Generator
7. The generator should have provided a TLSA RR for your use. The important sections are the first part (_443._tcp.yourdomain.com.) and the last part (<usage> <selector> <matching type> <hash>). We’ll use these two parts for actually inserting the DNS record. The last part of the tutorial will be for placing the DNS record into the DNS4.PRO hosting service, but if your DNS host provides TLSA support, the instructions should be roughly equivalent.
8. Now we need to take the generated record and add it to our DNS zone. Simply go to your DNS host interface, click to add a new entry, select the type of record as “TLSA”. Now you’ll need to take part of the record location (before the domain name) and put that as the zone location. For example, if the generator gave you _443._tcp.mydomain.com, you’ll use just _443._tcp . Now you’ll need to put the actual hash (and metadata) into the data portion of the DNS entry. See below for an example.

Adding a TLSA record to DNS4.PRO DNS host
Checking TLSA
There aren’t a lot of pretty web-tools to validate TLSA but there’s a couple that do a good job. My favorite is https://www.had-pilot.com/dane/danelaw.html. Just enter your domain name, switch the select-box to TLSA Record Only and see what happens. It either works or it doesn’t. 🙂
Another tool I’ve had good success with is one that requires you to install a browser extension and some software but it’s painless, really. https://www.dnssec-validator.cz/ not only checks for TLSA but also DNSSEC in general and it’s a passive scan so you can just leave it in the upper-right of your browser and check out how insecure the domains’ DNS you visit are.